|
Introduction
Brian Pawlowski may have written the most complete essay on Edward Weston's Shell, 1927 ever published. Brian started with photographing a Nautilus nearly similar to the one photographed by Weston, ending up with a photograph nearly identical to the one made by Weston, yet not totally similar because upside down and lit differently. Brian continued with a thorough investigation of all things surrounding Weston's photograph, including a study of the image's dimmentions, of the cameras used, and of Weston's intent. During a workshop offered by Kim Weston, Brian purchased one of the very few original prints of Shell, 1927, bringing even closer his work and Weston's work.
Sometimes, as photographers, we find ourselves enthralled by the work of other photographers who came before us. When that happens, too often we attempt to dissimulate our fascination for the work of other artists, and try to erase all traces of the origins of our work. Brian took the exact opposite approach, not only leaving all traces as they appeared, but also bringing forth more traces that a cursory comparison may have missed. For that we can only praise him, not only for what he teaches us through his study of this image, but also for the lesson he is giving us all about acknowledging the importance that the work of famous photographers plays upon us.
Notes on Photographing a Nautilus
Appropriately, I'm sitting in a hotel in Oaxaca, Mexico taking a break from a workshop that explores Edward Weston's Mexican Years through photography, location and discussion. The workshop I am participating in is led by his grandson Kim Weston. After two prolonged stays in Mexico in 1924-1926, Edward Weston returned to the United States, and at 41 years old entered a prolific period producing some of his greatest images of the nude and still life.
I have been studying photography for its own sake since June of 2003, and have been interested in the human figure, still life and landscape. I have been studying privately with a few photographers, taking workshops, reading, looking and practicing. Before the workshop in Oaxaca, I discussed a recent photograph I made of a nautilus shell with Alain Briot. The image was more than inspired by one of Edward Weston's. Alain asked me to transform some notes on making the image into a brief article, and I thought “What better time and place to begin than in the footsteps of Edward Weston?”
The Image
The final image I produced was straightforward and simple. The process by which I got to the final image was not. And somewhere along the way I learned some things.
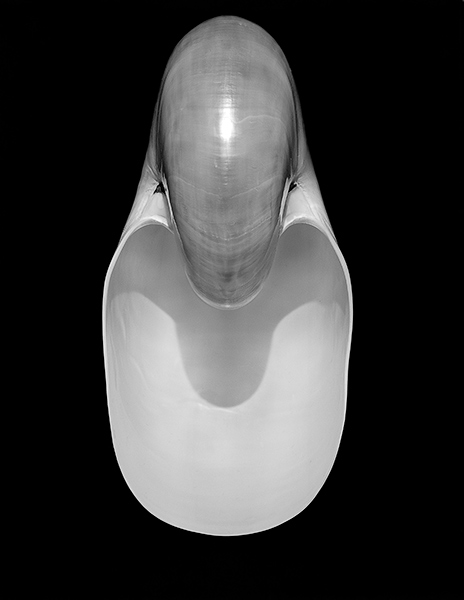
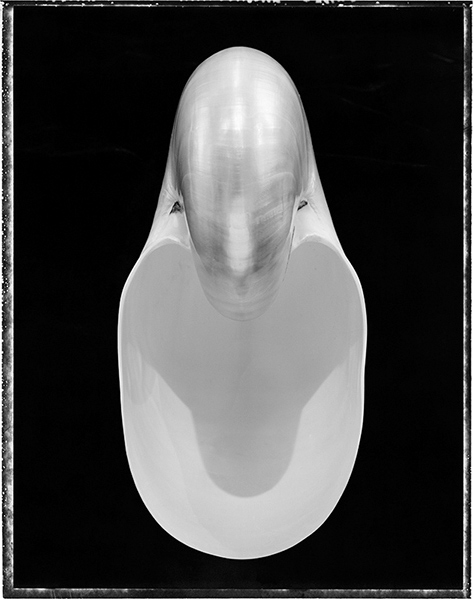
Nautilus 2005
by Brian Pawlowski
The shell was lit by a single overhead halogen light six feet away. The shell is standing on end with its camera (outside living chamber) held in position with modeling clay on a deep black background.
I took a circuitous route in making this photograph. In August 2005, I purchased a used Graflex Super Graphic 4x5 camera on Ebay - my first (and only) Ebay experience. The camera was intended primarily as a source of spare parts for my existing Graflex Super Speed Graphic 4x5 camera which had become my camera of choice for much of my formal large format photography. The new (used) camera and many original accessories arrived in pristine condition and I thought I actually now had a backup body and lens. Since the seller was not the original owner nor a photographer they were unable to state that it worked (no light leaks, shutter to speed, etc.), so I decided to run some tests - using the nautilus shell as a test subject and doing some macro shots that had been on my mind for a while.
I picked up the nautilus shell some time back to do still lives, after seeing a contact print of Shell 1927 by Edward Weston. Before doing the test still life studies of the nautilus shell alone with the recently purchased Super Graphic, I had done a figure study with my Super Speed Graphic entitled Nude and Shell.
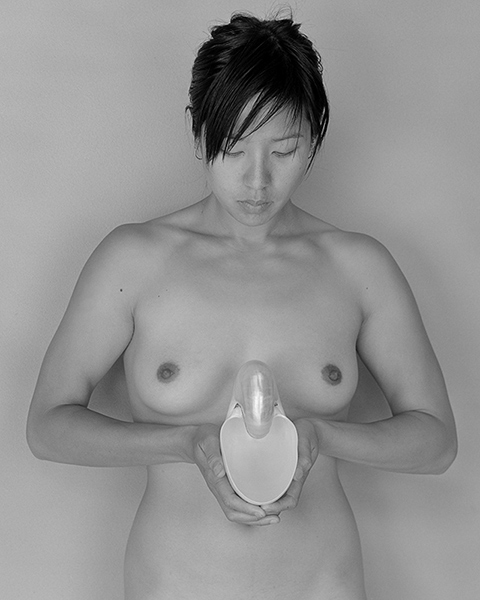
Nude and Shell
by Brian Pawlowski 2005
This image was my attempt to merge the still life with the nude, and the result was successful as a study of symmetry and tone. The nautilus shell subtly glows white against the model's darker skin. Clearly, the model is holding a shell - in later images the shell becomes more abstract.
The figure study was shot in open shade using my Graflex Super Speed Graphic with its original 135mm Optar f/4.7 Graflex 1000 lens and captured on Fujifilm Acros 100 black and white film. I use a digital darkroom workflow (as described below) for
both film and original digital capture.
My introduction to view cameras and the Graflex cameras
Alain Briot introduced me to view cameras during a landscape workshop in 2004. At the time I was only shooting a Canon 1Ds digital SLR camera. I became intrigued with large format watching Alain use his Linhof Master Technika. Alain prophetically said “I see large format cameras in your future.”
I first purchased an Arca-Swiss Field 4x5 Monorail camera and a few lenses. My intention was to slow down and work more on visualizing and composing a scene and shooting less - I achieved slowing down a lot. Though discipline with a digital camera can achieve the same thing, a slower more thoughtful approach is forced on you with large format cameras (especially with a monorail in the field).
I purchased my first used Graflex Super Speed Graphic camera used for the figure study above and my obsession with press cameras was born. A second camera, the Graflex Super Graphic, was used to make the image of the nautilus. See below for additional information on these cameras.
Making the image
Since purchasing the nautilus shell I had planned on doing still life studies, and the lens and camera test provided a convenient opportunity. The image I wanted to try was the shell positioned on a highly figured polished black walnut platform. I decided to quickly do the test - failing to remember that “quickly” and large format are not two words that often go together. I chose Polaroid 55 Positive/Negative film for the test as I could immediately inspect the results to determine the condition of the camera, and walk away with a fine-grained negative for later printing.
The wooden platform I shot on was illuminated by a couple of halogen lights and ambient light from surrounding windows. I setup the nautilus shell standing on end using some modeling clay I had bought for that purpose a while back. I mounted the camera an Arca-Swiss B1 ball head attached to a Manfrotto carbon fiber tripod. I had to remove the extension arm to allow the camera to be dropped down low enough as the platform was only slightly raised from the floor. The shell is about 8 inches high, and I positioned the shell with the opening down, the camera angle being pointed down at about a 30 degree angle. The reproduction ratio is about 1:2.
Metering the shell I came up with a 60 second exposure onto Polaroid Type 55 Positive/Negative film (which I rate at 25 ISO to obtain a well-exposed negative).
I had really never done anything resembling a macro shot before with a view camera - and it can be argued that a 1:2 reproduction is not a macro shot at all - but I found focusing the nautilus shell difficult. The ground glass on the Super Graphic is not the best, and the mostly smooth surface of the nautilus shell had little detail on which to sharply focus. I chose to focus on the sharp dark areas of the shell where the outer chamber meets the tight curl and then shifting focus slightly to the front of the shell. Following focus with the lens wide open at f/4.7, I stopped the lens down down to f/32 (the smallest aperture Optar 135mm lens is capable of) to maximize the depth of field.
And I took the picture.
I quickly determined that the camera and lens were in superb condition.The following image is a snapshot of the positive of perhaps the third Polaroid I shot. When I first saw the image, I was disappointed in that I felt the wood grain detracted from the pure form of the nautilus shell - the background was too busy. Also, the reflections off the gloss surface of the polished wood did not provide sufficient contrast to the white of the nautilus. That the shallow depth of field left part of the platform in sharp focus and some out of focus was also distracting. Finally, the image seemed to me to be more clearly and recognizably a shell sitting on a platform. And I decided to move away from that.
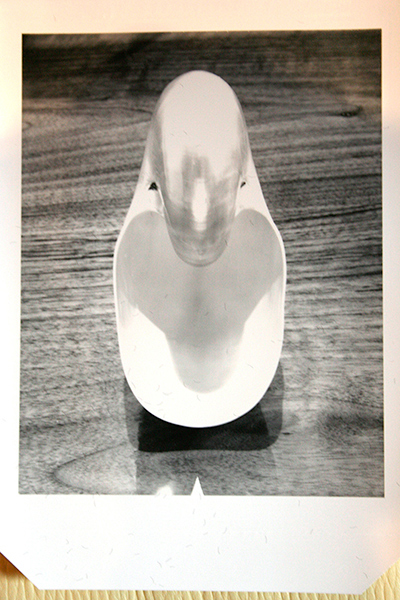
One thing I did like was the shadow within the shell resulting from the strong overhead light. I quickly came to the conclusion that this was turning into a study of symmetry, and above the shadow is distinctly out of line with vertical axis of the shell.
The print above is slightly overexposed - which meant that my negative was correctly exposed (there being a full stop difference between the speed of the negative and the speed of the print, the former being slower, which means that you cannot simultaneously get a properly exposed negative and a properly exposed print). Since both reciprocity and bellows extension factor came into play I was unsurprised that the first image at 60 seconds was underexposed. I did a couple of test exposures with the Polaroid film and since I could immediately inspect the results I eschewed calculating the exposure time compensations and adjusted the exposure by inspection of the Polaroid test print. By the time I took the above photograph I had adjusted my exposure time upwards and settled on 90 seconds.
I need to mention that during this session I did not look at Edward Weston original image - I had only a memory of it from several months before. In fact, I misremembered two key points: his orientation of the shell (inverted with respect to what I chose), and the background (which I incorrectly remembered as the curved interior of a tin funnel, when in fact that was the background for 1930 Pepper 30).
At this point the lens test was complete - but I was dissatisfied. I made the time to make an image and stopping short of something I liked bothered me. Photography is not about the equipment - though the tests were done to ensure the equipment is working. In any craft, which can include painting or cabinet making, the tools used need to be in good working condition so as to not get in the way of the artistic process. But in the end, for photography, the final resulting image is the goal and the reason for the pursuit.
So the pursuit began.
As is often my reaction to a photographic situation that is not in control, I tried to simplify things. When in doubt on backgrounds I grab my Photek Blackest Black velour backdrop. I had done some studies of orchids against a deep black background, and I like the disorienting floating sensation that resulted given a strong form for a subject. The black backdrop both simplified the background and eliminated the unwanted shadow beneath the shell.
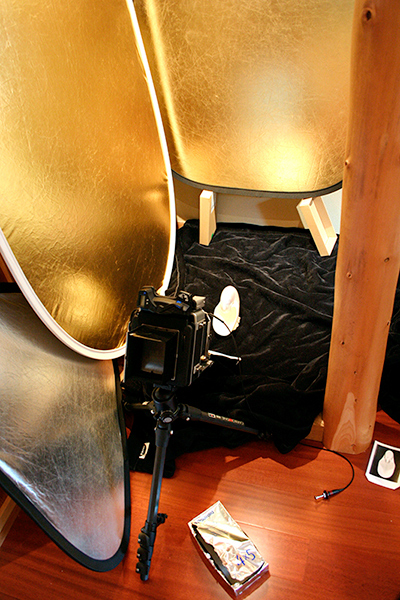
The setup is shown below.
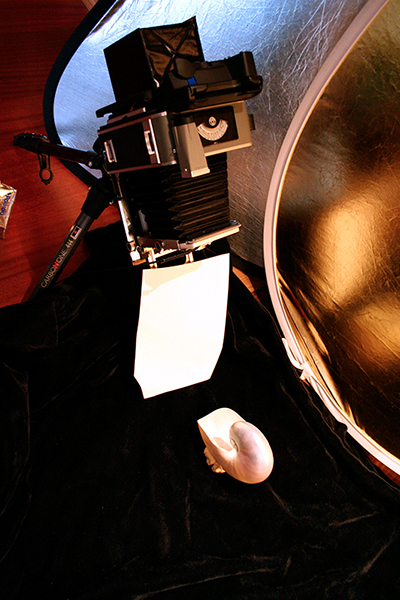
The white paper in front of the Graflex was used to bounce
light into the shell to open up the shadows
In the above image, the modeling clay used to prop up the shell is clearly visible. The folds in the black cloth fade almost entirely to black when I expose the shell correctly. Here is another view of the setup showing the reflectors I brought in an attempt to balance the illumination of the shell through some fill light bounced in from the sides.
The following image is a near final version. The pure black background simplified the image by eliminating the visual distraction of the wood grain, and the shadow of the nautilus from the strong overhead light source on the wooden platform.
I kept this picture around for a few days and thought about it. It was close to where I wanted to be - but two things bothered me in the end. First, while perhaps not entirely clear in the above picture, there is a faint shadow on the left interior of the chamber from a sidelight halogen spotlight to the right. This I felt broke the strict symmetry I was attempting to achieve in the end. Second, while I liked the effect of the shadow within the outer (living) chamber, it looked clumsily large in relation to the curl of the shell generating it. To fix these problems, I reduce the lights to a single halogen spotlight from above, and positioned the shell with respect to the light to have a symmetrical smaller single shadow cast within the outer chamber by the curl above.
In this version I left the borders of the Polaroid film in, but in the end found it visually distracting from the main action and as the final image at the start of the article shows I simplified even further.
Lastly, the shell above is more centered vertically than in the final image I made - a slight shift upwards of the shell within the frame enhanced the feeling of the shell being suspended in space in the final print.
Let us now consider the original inspiration for my still life studies with a nautilus shell.
Nautilus 1927 by Edward Weston
Here is a reproduction of Edward Weston's Shell 1927 as printed from the original negative by Cole Weston.
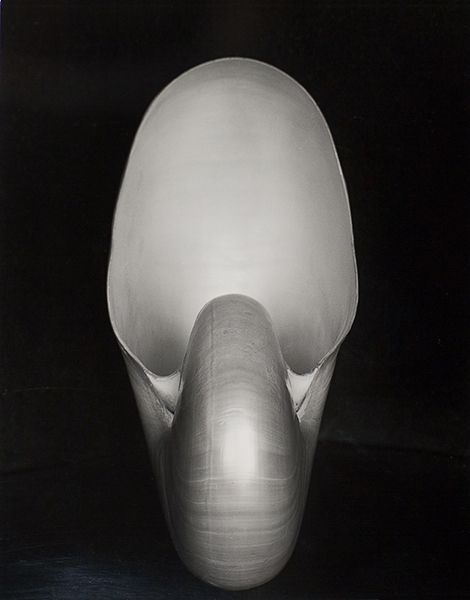
Negative S1, “Shell, 1927”
by Edward Weston
The first thing that struck me when I returned to consider Edward Weston's original image was that I had by stepwise refinement achieved a similar solution by using a dark (in my case featureless) background to focus the viewer on the shell itself. I actually was a little disturbed as my final image ended up resembling the original Weston image too much - but I was also struck that perhaps the nautilus shell itself suggests certain standard solutions as a subject for photographic study.
The next difference I noted on studying the original Edward Weston image was the greater sense of depth Weston's image possesses. I think there are at least two visual cues contributing to this. First, as Kim Weston pointed out to me, the shell was photographed propped up on an oil barrel. On closer inspection, one can see the arc of the edge of the barrel at the lower third line in the image which subtly divides the space occupied by the shell. The subtle, but critical, visual depth obtained greatly enhances feeling of depth in the image. I think my case I failed to work the background to produce a satisfying image. A lesson to be learned from Edward Weston is found in his daybooks on his work in photographing shells:
I worked all Sunday with the shells, – literally, all day.
Only three negatives were made and two of them were done as records of movement
to repeat again when I can find suitable backgrounds.
I wore myself out trying every conceivable texture and tone for the grounds:
Glass, tin, cardboard, –wool, velvet, even my rubber rain coat!
Edward Weston, The Daybooks of Edward Weston
Edward Weston goes on further in the entries on the interaction of the various backgrounds and their effect on the luminosity of the shell. As I saw in the Nude with Shell versus the Nautilus still life, open shade or some other softer light acts to bring out this luminosity. He noted that a white background (similar to the lighter wooden platform I attempted) reduced the contrast of the shell.
A second visual cue is the gradation of the shadows within the chamber. As your eyes sweep down through the open space of the chamber, the darker shadows behind the curl seem to recede into the interior of the shell - giving the illusion that you can stick your finger inside the shell's image. My inclusion of the shadow of the curl within the chamber itself defeats a similar effect and eliminates the visual cue.
Edward Weston in his daybooks says that at this time he was shooting with a Rapid Rectilinear with a modified aperture to achieve a f/64 (equivalent to the old style US 256 aperture) to obtain the maximum depth of field possible in the 8x10 negative. If attempted again, I would use a different lens capable of stopping down further than f/32 to obtain maximum depth of field and image sharpness.
Edward Weston reported in his diary entries that Tina Modotti and their friends in Mexico City reacted to the shell images with phrases like “They make me think of lilies and of embryos. They are mystical and erotic.” In a biography of Edward Weston on induction to The International Photography Hall of Fame, Jozef Gross is quoted:
The image is not at all about a nautilus shell but about
those elements in the object which conjure up other
organic phenomena or functions, mainly human and sexual.
I was struck by the entries in his daybook (diary) describing reactions to Edward Weston's images since people reacted in a common way to the image I made - several using the word “embryo.” However, in a case of culture informing interpretation, at least one person remarked to me that the image looked like an “alien” as in the 1979 movie Alien directed by Ridley Scott, which certainly could not have been a reaction to Weston's original image. My choice of inverting the orientation compared to Weston's original reinforced that reaction.
I was perhaps as intrigued by comments made to me about a nautilus image as Edward Weston was. While I was concerned with form, composition, tone and the technical details of creating the image, I always held in front of me a nautilus shell - I was intrigued and please by people's reaction to the image (some never recognizing until told that it was a nautilus shell). Edward Weston related in his daybook his surprise that devoid of explicatory context the nautilus shell becomes abstract and provides a place for the viewer to enter the image:
For I can say with absolute honesty that not once while working with the shells
did I have any physical reaction to them: nor did I try to record erotic symbolism. ...
Others must get from them what they bring to them ...
Edward Weston, The Daybooks of Edward Weston
I remembered the way the shell was stood on end in Weston's original image, and thought it an unconventional presentation of a nautilus. The orientation of the shell as photographed by Edward Weston is inverted with respect to the image I made - another case of poor memory. I chose the larger part of the shell as my base, while Weston balanced the shell on the smaller part. I think his orientation adds a delicacy and visual balance that my image lacks. The unconventional orientation that Weston chose for this image (as opposed to other images of the nautilus shell he made) eliminates the distinguishing characteristic of the spiral of the shell - creating a more abstract form inviting reinterpretation.
What I discovered in the simple lens test - and in reading relevant sections in Edward Weston's daybooks - was the passion obtainable in the small, in the common, and the possibilities hardly touched on even in the few hours effort I made:
Late in the afternoon I took out the Chambered Nautilus thinking to improve on the first negatives:
instead there came to me a new group over which I am absolutely ecstatic.
It was too late for an exposure so I must be patient until this afternoon.
I find myself, every so often, looking at my ground glass as though
the unrecorded image might escape me! There are so many slight variations I can make.
The last negative is better in most ways, –just one line I'm not so sure of.
Also the background might be varied. But I shall enjoy the struggle!
Edward Weston, The Daybooks of Edward Weston
Appendices and Further information
Appendix 1: Dimensions of Edward Weston's Shell 1927
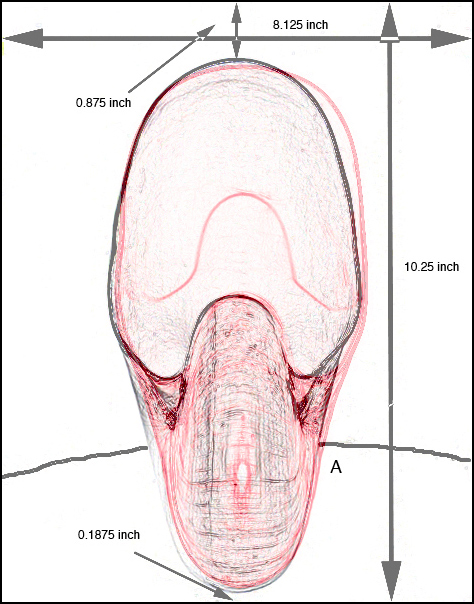
Out of curiosity I measured the dimensions of the original Edward Weston image and then rotated and normalized my image and created a red overlay. I enhanced the semicircle of the barrel rim in Weston's image to draw attention to it. In about 12 Polaroid shots of the nautilus shell, a pure centering from top to bottom did not work, and the top chamber being closer to the edge looked awkward, so while I worked with an inverted image, I positioned the curl of the shell closer to the edge of the image as the overlay shows. The two images startlingly overlap.
Appendix 2: A digital workflow for large format
The goals of my digital workflow are speed and efficiency. The goals are achieved by a combination of hardware and technique - with the latter being the most important. I am indebted to John Paul Caponigro and Katrin Eismann in their workshops for much of the techniques I use in my digital workflow. The less time spent in front of the computer the more time there is for photography - which is the whole point for me.
I scan my 4x5 negatives with a Hasselblad/Imacon 646 film scanner, at 16 bits per channel, 2040 DPI, in RGB mode - no sharpening in the scanner and really no image adjustments. I do not scan black and white negatives as negatives but rather in RGB 16 bit mode and I Invert the image later. For a 4x5 negative or slide this results in an 80 Megapixel digital image. The Polaroid film scans well - the scanner is easier to work with given a thinner negative rather than a dense one. Occasionally on clearing a Polaroid Type 55 negative I get some orange staining. In Photoshop I choose a color channel that minimizes the appearance of the stain, converting to grayscale and then back to RGB.
Whether starting from a film original that I scan, or direct digital capture, I use Photoshop CS2 as my digital darkroom on a 4GB memory Apple dual G5 computer.
My digital workflow is routine:
- De-dusting on a duplicate of the background layer (More work for a scanned film original than a direct digital capture. I most often use the Healing brush, and sometimes the Dust and Scratches Filter and the History Brush, to remove dust.)
- Adjust the black and white points in a Levels adjustment layer.
- Correct image brightness in one Curves adjustment layer.
- Adjust image contrast in a second Curves adjustment layer.
- Final selective dodging and burning in a Neutral layer with layer blending mode set to Soft Light. At this point I have my final digital negative or slide which I save.
- I capture sharpen and output sharpen (depending on the target output device) in two steps using PhotoKit Sharpener
upon choosing the final target output device. I flatten the image obtained from the previous steps and capture sharpen, resize and output device sharpen and then print.
The workflow is non-destructive to the original image, and consists primarily of adjustment layers on top of the original image. I print the image digitally on an Epson 4800 or 9800 printer, or a Fujifilm Lightjet printer at a pro lab. While the Optar is an older lens, the detail in the negative was outstanding, and I have printed my images shown above to 16x20 inches with great results.
I have had some success making enlarged digital negatives using Mark Nelson's Precision Digital Negative method onto Pictorico OHP film for contact printing Platinum and Palladium prints - perhaps a topic for a future article.
Appendix: My large format cameras
The first large format camera I bought was an Arca-Swiss monorail. It is a solid, precise view camera capable of full movements. For architectural work and for studio work, a great choice. I took semi-private instruction with Alain in Phoenix, Arizona in the use of this camera which helped me advance more quickly in view camera technique The Arca-Swiss monorail is a modular system and I subsequently purchased additional elements to also shoot 8x10 film.
While expressing my frustration with setting up and taking a shot with the Arca-Swiss Alain mentioned that he could set up his Linhof Master Technika more quickly than a monorail and in fact this type of camera had been used handheld for sports action shots. There are two basic types of view camera - the monorail like my Arca-Swiss, and the flatbed which folds into a compact portable unit and is very fast to set up. I subsequently learned that certain flatbed 4x5 cameras - the old press cameras - were extensively used throughout the 20th century before the advent of the 35mm camera. Discussions with Charles Gatewood, another photographer I study with, led me to the photographer Weegee and his use of Graflex cameras. Widely and inexpensively available on the used market, the Graflex cameras strike me as a poor man's Linhof.
The Graflex Super Graphic was my second Graflex in addition to my original Super Speed Graphic. The only difference between a Super Graphic and a Super Speed Graphic is the lens. The Super Graphic has a standard 1/400s in-the-lens shutter with the lens made by Wollensak, while the Super Speed Graphic has a 1/1000s in-the-lens shutter with the lens made by Rodenstock - otherwise the cameras are identical. The Super Graphics are all metal construction, rugged, and sport a revolving Graflok back that is very convenient to use. While it has more limited movements than a monorail, a Graflex Super Graphic is an excellent camera for portrait and figure studies.
Resources and recommended reading
A detailed chronology of Edward Weston's life. A brief article on Edward Weston and Modernism. A brief Edward Weston biography on induction to The International Photography Hall of Fame.
A series of articles about Edward Weston on photography.about.com:
• Brief biography
• The Early Years
• Edward and Tina
• Nudes and Peppers
• The Guggenheim Years
• Final Journey
A bibliography of major articles and news items about Edward Weston.
There are many books written about Edward Weston. The Daybooks of Edward Weston are a unique record of a photographer's growth and influences and philosophy. A large collection of images and writings can be found in Edward Weston: A Legacy. The basic monograph of images is Edward Weston: The Flame of Recognition published by Aperture.
Graflex.org is the canonical site for detailed information on these wonderful cameras. The camera I used to make the images in this article was the Graflex Super Graphic. Some additional information on the Super Graphic cameras. When using the Graflex cameras handheld, I use at least 400 ISO film (which I may push +1 or +2 stops in development) and zone focus while framing with the sports finder. On the off chance that I have not actually scared you off from trying out large format photography, Quang-Tuan Luong's comprehensive site is a great place to learn more about large format photography before buying.
Polaroid has an article on basic processing of Polaroid Type 55 Positive/Negative film. Mastering Light with Polaroid Type 55 Positive/Negative film describes how to create a master negative from the film. The data sheet for Polaroid Type 55 film has information on reciprocity characteristics and development time.
Sea Shell City is a reliable source of Nautilus Shells.
I use the PhotoKit Sharpener plug-in to Adobe Photoshop CS2 that supports a multi-pass sharpening workflow as described in this article, this article and this article. I have used the new Smart Sharpen filter in Photoshop CS2 with fair success also.
Introduction Copyright © Alain Briot 2005
Essay and photographs Copyright © Brian Pawlowski 2005
Shell 1927 photograph Copyright © Edward Weston
.
|
 |
|
|
|
|