|
Introduction
Enlarging a digital photograph is always a challenge, especially when you start with an original file which was created in less than perfect conditions, such as the image which is the subject of this essay, or when you want to go beyond the "reasonable" enlargement size that your camera resolution can deliver, which is also the case in this instance.
So how do you do it? There are many different approaches, workflows, software solutions, programs, ideas, concepts, beliefs -- and then there is the final result, which eventually, when all is said and done and the print is displayed in your living room, is all that matters. Well, here is how George Jerkovich, one on one consulting student, created a 30x40 enlargement from a 1DsMk2 file created in less than perfect conditions. And here is George's description of the process he followed. I believe you will find George's account a worthwhile read.
How to make a 30"x40" print from a 1DsMk2 taken at 1/8 second at ISO 1600
by
George Jerkovich
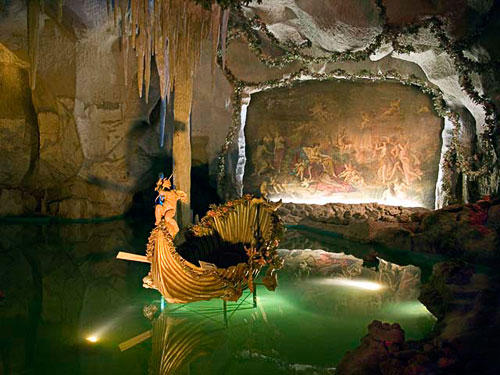
This image was taken at 1/8 second, ISO 1600, handheld. Exposure was calculated with aperture priority mode on a Canon 1Ds Mark 11 with the Canon 28-300 IS zoom. Since this was a static shot the IS mode was set to 1.
Incidentally, this is a photograph of the Venus Grotto at Linderhof. This was a palace built in the late nineteenth century by King Ludwig II of Bavaria. It was made to look like an cave where Wagnerian Operas were staged privately for the King.
It helps to have good equipment; however I took special care to hold the camera firmly a to minimize movement. There was nothing to lean against but I made a point of wedging one arm against my body and holding my breath as I gently squeezed the shutter. Any poking or abrupt movements would have ruined the shot. I always use the 16mp RAW and 4mp jpeg file size when I shoot "serious" work.
Allow me to stress the importance of the RAW image. It is imperative to become comfortable capturing in RAW. This format gives the greatest flexibility without sacrificing data to make adjustments. Jpegs falls short since they are processed by the camera giving you far fewer options in Photoshop. This image size would not have been impossible had I worked only with a tiff or jpeg.
I decided to convert this image at 240dpi in 8bits for a file size of 72 mb. Many believe that 16bit, 300dpi-360dpi are essential. I agree that the higher resolution and bit depth would be optimal but the practical issues outweigh the purist sentiment. This is a large file and it slows my Windows computer down quite a bit. There are differences between a file at 240 dpi versus one at 300-360 dpi, and I concede that the larger is better. However when the finished print is viewed at a respectful distance, the way one views art, the differences are minimal.
In Adobe Camera Raw I used the automatic suggestions as initial settings. I then turned them off and tried on my own. Usually I use the color balance designated as "as shot". If I have multiple images that I want to look the same I will choose one of the presets. There is nothing magic or inherently correct about any of them. Depending on the situation some give more accurate rendition than others, but ultimately the choice is yours...much the same as you would choose a type of film over another.

Venus Grotto at Linderhof
George Jerkovich
I adjusted the image in the order that the sliders appear on the menu starting with exposure, shadows, etc. The idea was to produce a pleasing image with the histogram strong in the mid tones and not pushed up against either end. Usually I do not make changes in the saturation. With this particular image the automatic suggestions worked well: temperature 3800, tint +26, exposure -1.35, shadows 0, brightness 95, and contrast +22.
I clicked on the details tab and viewed the image at 100%. There was significant luminance and color noise. I looked in a dark area for problems and diminished them greatly by pushing both sliders to around 60. The image had some fringing in the highlight area which was corrected in the lens menu.
At this point I converted the image and opened it in Photoshop.
There were some areas on the inside of the boat, curtain and garland that needed to be brighter to command greater attention since they were objects of interest. So I went back to the original RAW image and opened another version changing the exposure to 0 to make this second image brighter than the first image.
The second image was superimposed on the original using the position tool with the shift key depressed. This created a new layer to which I applied a “hide all” mask. The dark areas that I wanted brightened were painted in using a brush with white as the foreground color. This technique allows the dynamic range to be maximized.
I removed a yellow color cast with the Levels function. I also applied Unsharp masking with these settings: Radius 50 and Amount 20. This is not to sharpen the image but rather to cause it to "pop". It increases local contrast. This is a technique discussed on the Luminous Landscape. I did not make other significant adjustments in Photoshop since most had been made in Adobe Camera Raw.

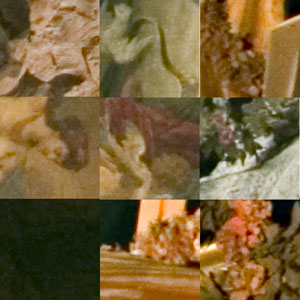
100% crops of various image areas
Click on the image to see the full size version
I then sized the print. I have VFzoom and the latest Genuine Fractals which incidentally does not work with CS2 so I don't use it anymore. Instead I used the image size command in Photoshop. I set the size and resolution and selected the bicubic sharper algorithm in the pull down menu. I like the results. After enlarging the print I sharpened the image using Smart Sharpen at slightly less than the default settings.
The image was printed on Epson Glossy Photo Paper (250) on the Epson 9600 with Ultrachrome inks and using the Epson driver. I used the profiles provided by Epson. When I print I use the unidirectional mode and other adjustments. It slows printing speed but maximizes quality.
I did not use a RIP and printed directly from Photoshop. If you do this keep in mind that large files cannot be printed without setting the amount of RAM to about 25% in the Photoshop preferences. If you don't do this the program will shut down as a runtime error. It was after much searching that I found this solution. Also if printing oblong images you must turn off the Advance Options features in the driver or it will cut off the last few inches.
In conclusion I started with a Raw file and used care in CS2 to get the best print. I was amazed at the quality. The print is a little soft but noise is minimal. The sharpness is adequate - just not superb. There is no way that such quality could have been obtained with similar conditions using film.
George Jerkovich
About the Reflections on Photography and Art series
This series focuses on real-life photographic experiences, either in the field or in the studio. If you have a story to share about your photography, or have images that demonstrate the use of a specific technique or images that were created in unique conditions, email me your ideas or email me your text and your photographs. I look forward to hearing from you: alain@beautiful-landscape.com
About working in Photoshop and printing
There are two separate aspects of creating a fine art photograph. One is taking the photograph, the other is preparing the image file so as to get the best possible print. If you are interested in learning how to do the later take a look at my just-announced seminar: The Expressive Digital Fine Art Print. This seminar is a comprehensive course that encompasses the knowledge I acquired on this subject over the course of my career.
Design & concept Copyright © Alain Briot 2005
Photographs Copyright © George Jerkovich 2005
All rights reserved worldwide
.
|
 |
|
|
|
|